You all know what a Portal Gun looks like....right?
Back in August 2011 my friend, Laura, asked me to make her a Portal Gun to go with her costume.
'Sure, no problem!' I said thinking that I'd knock up a quick and serviceable prop. But after a quick search of other Portal gun builds I decided that I had to make it look half decent to compete with the others out there. The more I built, the more detailed it got...and the more I spent.
So here it is, 3 months later, the entire build in photos for you.

Using this workspace in my shed......

....I am going to take this pile of bits....

...and make THIS!!! Well that was the plan ;o)
That's me by the way, Hello.
That's me by the way, Hello.

After taking several measurements from the schematics I decided on the correct sized tubes for the main barrel. The clear chamber was to be made from a plastic mead bottle. I could've purchased a section of perspex tube but I was trying to keep the cost down to a minimum.

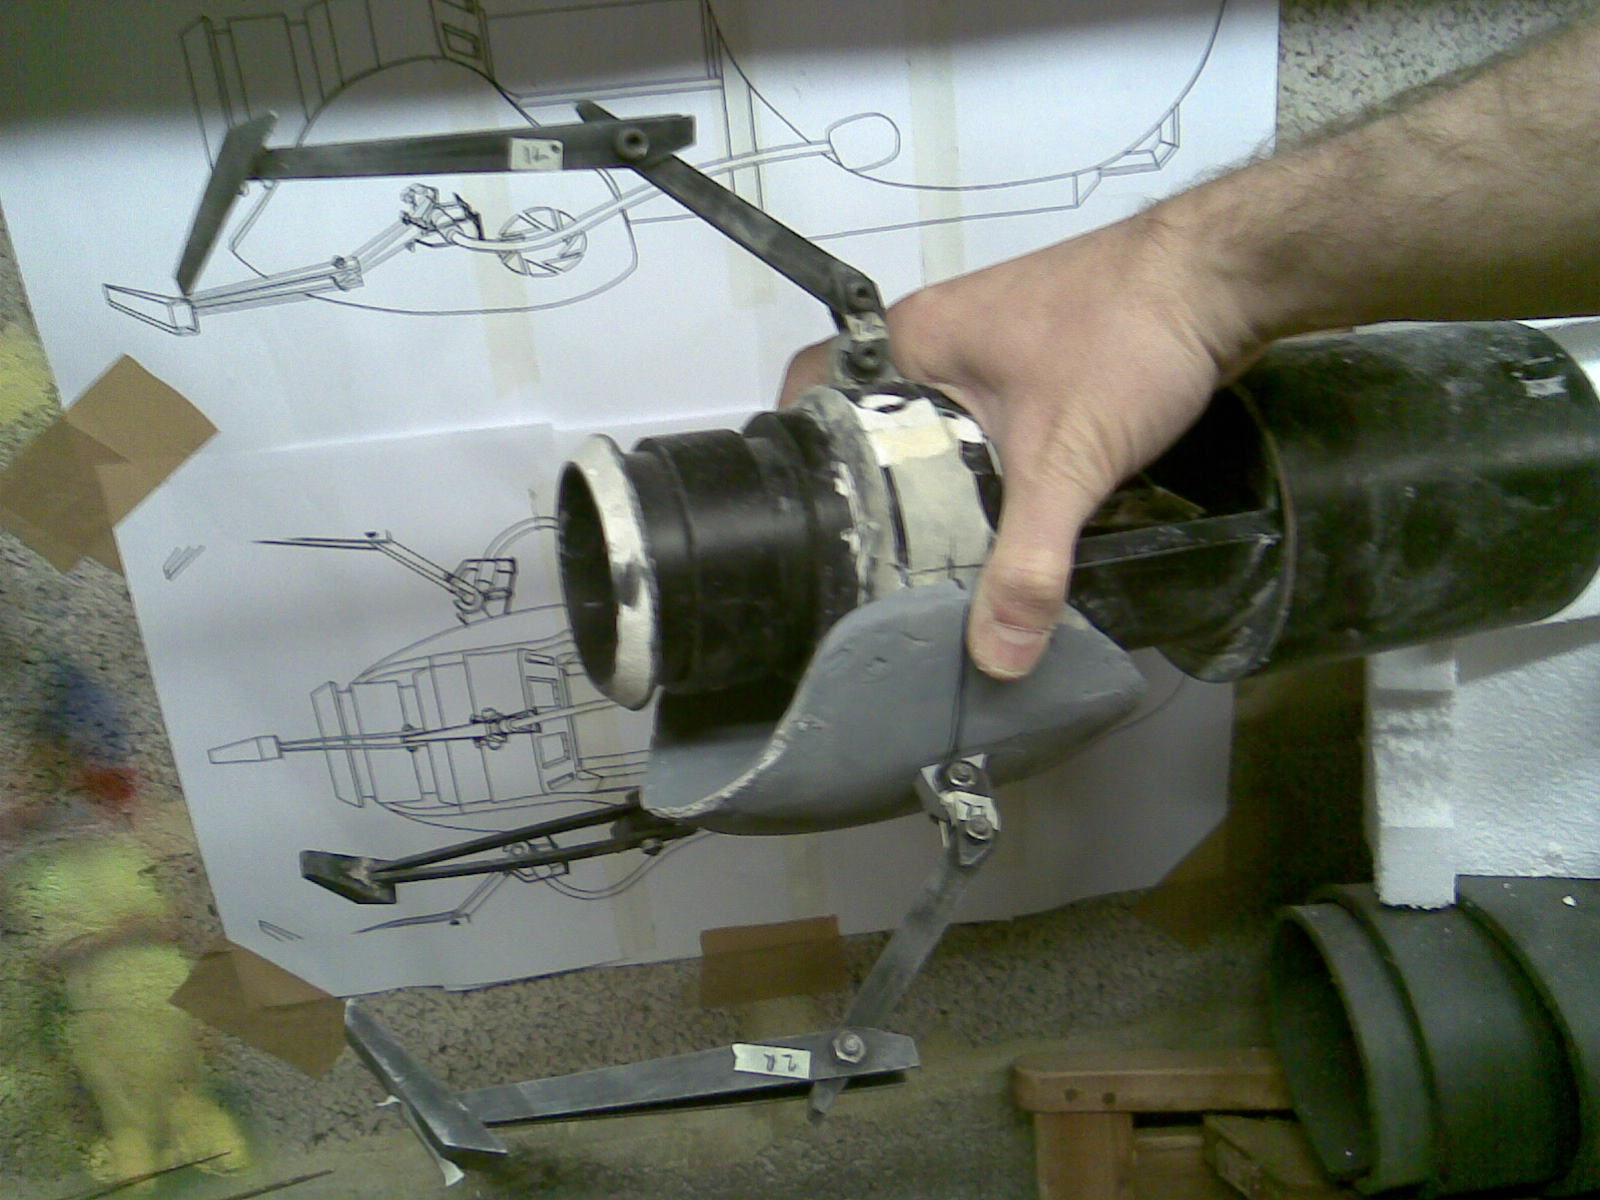
Now, I won't lie to you, if it weren't for Volpin Props' amazing Portal Gun build I wouldn't have got anywhere with this. His build was my inspiration for this and by following his blog I've picked up so many new techniques, ideas and skills that I can't even begin to list them. So credit and many thanks to him. Go check out his other builds, they are amazing!!! As you can see I printed out a load of pics from his blog as reference material.

As I was going to be using polystyrene to carve the two white shells from I had to glue several thin sheets together (I couldn't find thick sheets for free anywhere) so PVA glue and heavy weight did the job nicely.

The main barrel was made from a piece of plastic pipe that I had in the loft. It had a load of old posters in from when I was a teenager (I'm 33 now) so it's been around for a while.

I'd planned to make most of the major cuts using a band saw at work but as the thing wouldn't work I had to use a hacksaw and fretsaw. I ended up cutting everything by hand. I'm going to invest in a scroll saw before starting any new builds.

Does the clear bottle fit?
Yep.
I probably should've checked this before starting....
Yep.
I probably should've checked this before starting....

The outer barrel required a thicker tube. I didn't have one the correct size so I ended up splitting thinner ones and laminating them together. This left a section at the end that needed a patch inserted but beggars can't be choosers.

With the inner and outer sections together you can already see the basic shape forming.

Time to break out my new toy to join the barrel sections together.
It's called a hot glue gun for a reason...the glue is hot.
As I found out when I first used it and burnt 3 fingers on my right hand. Fail.
I had to buy this for the build but I didn't count it as a cost as I'd be using it lots for various DIY jobs.
It's called a hot glue gun for a reason...the glue is hot.
As I found out when I first used it and burnt 3 fingers on my right hand. Fail.
I had to buy this for the build but I didn't count it as a cost as I'd be using it lots for various DIY jobs.

Another necessary purchase were these hex-head/Allen key bolts. I had nothing in my huge tub of screws and bolts that was suitable. This took the cost of the build up to £2.70. Bargain so far!

Next was the detailing on the front of the barrel. I copied Volpin's idea for this and after marking out the relevant area...

...I cut small triangles of plastic, glued them into place...

..and with the application of some car body filler both here and down the sides of the two pipe sections the whole thing was looking good.

Some filler at the front end of the barrel created a nice bevel even if I did put it in the wrong place.
But no one's going to be that picky....right?
But no one's going to be that picky....right?

While the filler was drying I set about making a hot wire cutter for shaping the polystyrene.
Again, I know that you can buy these but as it was a budget build I had to improvise. An old power adapter, 3 bits of wood, a guitar string and some screws, connectors and tape were all it took.
And it worked, much to my surprise.
Again, I know that you can buy these but as it was a budget build I had to improvise. An old power adapter, 3 bits of wood, a guitar string and some screws, connectors and tape were all it took.
And it worked, much to my surprise.

With the filler dried I took some more measurements and decided that the barrel was a little too wide. Bear in mind that there are several different schematics available online and none were the definitive scale or size so so guess work and artistic licence were necessary.
Hacksaw time!!!
Hacksaw time!!!

The new barrel section (the black tube in the bottom right of the photo) was a lot smaller than the rest of the barrel body so I had to make a small collar to join the two together.

TA DA !!!!

These 2 collars are for the end of the barrel. The black piece (like most of the thinner plastic sections of this build) was cut from a recycling bin lid.
I now have no recycling bin lid.
I now have no recycling bin lid.

They are glued into place...

...and more filler is used to create a beveled nozzle.

After a little sanding to smooth things out I was really pleased with how things were going.

Next on the list was the inside of the nozzle. There is a smaller set of rings with lots of fins coming off it, like a turbine blade. With nothing to hand that even resembled it I had to make it from scratch. A ring of bin lid plastic and a short section of pipe formed the central section.

Behind the fins are a lens and some mesh detail. Well there was on Volpin's and I liked the look of it so I set about recreating it. I cut a disc from some clear perspex that I had lying around.

Some car body repair mesh was perfect for the job.

See :o)
When I held the pieces up to take this photo I realised that the lens was far too clear so I used a wire brush to scratch the surface to make it more opaque. This photo was the result of that but after testing it with a single LED behind it I found it to be too transparent still.
One empty ice cream tub and a pair of scissors later and I had the required level of opacity.
One empty ice cream tub and a pair of scissors later and I had the required level of opacity.

I also cut a ring out of the perspex as a mounting bracket to glue inside the barrel behind the lens.

Like this.

Next were the fins themselves. These were cut from the same bin lid, 6 large ones, 6 small ones.

After sanding each one for a perfect fit in its location around the central section it was time to fix them on.

A paper template was used to make sure that the pieces were evenly spaced, alternating between the large and small sizes.

The finished nozzle insert looked pretty good but...

A few of the fins fell off as I picked it up as the superglue wasn't quite doing its job.

So I had to pin the fins in place from the underside. 2 holes and 2 short lengths of paperclip glued in each one seemed to hold everything together nicely.
And the paperclips were free.

A slight error in the measurement of the internal nozzle diameter meant that each fin had to be trimmed down by half a millimeter.
Which idiot was responsible for the measu...ooooh wait, it was me ;o)

Time to make the brackets that attach the 'arms' to the gun.
This was a test piece that turned out to be a little small.
This was a test piece that turned out to be a little small.

Here is the gun so far with the rear section pipe in place.
It's a length of sewer/waste piping. UNUSED I might add.
It's a length of sewer/waste piping. UNUSED I might add.

I found a semi translucent pipe in the skip at work which was perfect for the central core that lights up.
I tried everything for this - sweet tubes, plunger handles, toys, large pens...all were either the wrong length or the wrong diameter.
I tried everything for this - sweet tubes, plunger handles, toys, large pens...all were either the wrong length or the wrong diameter.

I have loads of LEDs in my electronics bits-box but none were blue. I had red and orange ones but as they were salvaged from various electronic devices I couldn't guarantee their reliability so I had to break the bank and buy some plus the relevant resistors. I also bought a rocker switch and a 2-way switch.
My theory was to take the battery positive and run it to all of the LEDs. A permanent negative would run from the switch to the red LEDs so that they turned on/off with the main switch. A second lead then ran from the switch to the 2-way, this split off to the blue and orange LEDs allowing the colour to be switched without affecting the red ones. This basic wiring was to test the concept.
My theory was to take the battery positive and run it to all of the LEDs. A permanent negative would run from the switch to the red LEDs so that they turned on/off with the main switch. A second lead then ran from the switch to the 2-way, this split off to the blue and orange LEDs allowing the colour to be switched without affecting the red ones. This basic wiring was to test the concept.

To fix the main barrel section to the rear I decided to use a bolt on method rather than glue. This would allow the whole thing to come apart for repair if necessary.
To do this I needed to strengthen the rear section so I cut out several collars from 1cm thick plastic. This was also salvaged from the skip at work. Above is the cardboard template for the collars.
To do this I needed to strengthen the rear section so I cut out several collars from 1cm thick plastic. This was also salvaged from the skip at work. Above is the cardboard template for the collars.

Craft-knife-tastic!

Here are the 3 nuts used for bolting the sections together.
They were cut around the edges using a hacksaw to make the surface uneven. This gave the filler something to grip to.
They were cut around the edges using a hacksaw to make the surface uneven. This gave the filler something to grip to.

Here is one of the collars in place inside of the rear section with the 3 bolts that screw into the nuts.

A crescent shaped piece was needed at the bottom as the two sections are different diameters.
This was cut from the same 1cm plastic and glued in then any gaps filled.
This was cut from the same 1cm plastic and glued in then any gaps filled.

I wasn't sure if the glue fixing the collar in would hold so I pinned it into place using 20mm lengths of a wire coat hanger.

This is the finished joiner collar in place with the front barrel section bolted on. Success!!!

As I was anticipating the final weight being a fair amount I decided that the handle at the rear needed to be super strong. A spare kitchen cupboard handle was the ideal thing. As I wanted the rear panel to be removable I cut an oval of bin lid as the rear plate for the switches, a collar to fix to the back of this and another collar to pin inside the rear section to mount the whole thing to the rear section.
A lot of cutting and all done by hand....phew!
A lot of cutting and all done by hand....phew!

The finished removable handle section with the 4 bolts that fix it in place.

And the handle in place.

Here you can see the crescent spacer, the collar for mounting the front section and the one for fixing the handle on. It may seem a bit overkill (it did at the time for me too) but the finished gun weighed loads so I'm glad I did this.
We'll just refer to it as forward planning yeah? ;o)

Time to mount the switches. The larger opening is for the power switch, the smaller one is for the 2-way switch. The 2-way was quite long so I made a spacer to reduce the amount of the chrome switch part that poked through the rear plate.

This is the mounting bracket for the arms of the gun.
The plastic proved quite tricky to sand smooth so when I had one I decided to cast 2 copies from resin.
I needed 3 in total and this copying/casting also ensured that they were identical sizes - something that would've been tricky if I'd cut them individually.
This is a cardboard surround to contain the mould rubber.

After pouring the rubber over the mount (I got into a right mess so I didn't take photos) I gave the main pieces for the gun a coat of primer.

This is the rubber drying, you may notice the change of box.
When I said i got into a mess I really did and I had to start again.
At least the mould rubber was free, we used it at work and they guys there have to mix up a minimum amount. This means that they throw away anything up to a 1/4 pint, unless I'm there to take advantage of it of course :o)
When I said i got into a mess I really did and I had to start again.
At least the mould rubber was free, we used it at work and they guys there have to mix up a minimum amount. This means that they throw away anything up to a 1/4 pint, unless I'm there to take advantage of it of course :o)

I decided to go one stage further and give the gun parts a coat of black too, just because I wanted to get a feel for how the prop was going to look.
The paint was also free from work...just don't tell my boss.
The paint was also free from work...just don't tell my boss.

This is the first pouring of resin into the mount mould.
Again, it's free as the guys at work throw away a fair amount each time.
Again, it's free as the guys at work throw away a fair amount each time.

Well, there is a LOT of sanding needed (not that you can tell from the pic) but the whole thing was looking good at this stage and a lot better than I could've hoped for.

Look at the rear on that, phooaaaarrrrr!!!!!

Back in my shed/workshop now, with the main gun barrel complete it was time to tackle the shells.
I'd been dreading this as I knew it would involve some sculpting...not one of my strong points.
I'd been dreading this as I knew it would involve some sculpting...not one of my strong points.

Having said that, this was a total surprise for me and the hot wire cutter worked a treat.

After some sanding, some filler and then more sanding it was starting to look ok.

Then the same for the front shell.

I decided that the polystyrene was nowhere near strong enough on its own, even with the filler on it so I tried a new idea - Plaster of Paris (also known as Potter's plaster)
I figured that I could put plaster-covered cloth strips over the polystyrene to copy the shape then reinforce this with expandable foam to make up the bulk of the shell thickness.

This was the result...

While the plaster was drying I started work on the arms.
There were no definitive measurements for these (just like the rest of the gun) so I made some cardboard templates and adjusted them until they looked right with my gun. Artistic licence and all that.
The 3 pieces on the left were cut from that 1cm thick plastic and the 6 on the right from the bin lid.
Once again, all by hand (I found out once I'd finished the gun that a guy at work had a scroll saw that I could've used......typical)

Looking good so far.

These are the pieces that fix the arms to the mounting brackets made from more bin lid plastic.

After drilling holes in the arms I couldn't resist bolting them together to have a look at them.

This is the result of the plaster work.
I knew I'd be cutting a line into the larger section so I thickened it with filler.
The smaller shell was weak as hell so that got a good layer of filler to strengthen it.
I knew I'd be cutting a line into the larger section so I thickened it with filler.
The smaller shell was weak as hell so that got a good layer of filler to strengthen it.

Back to the barrel, I needed to get wiring up to the front of the gun for the LEDs.
A little forward planning would've allowed the wires to be run up between the inner and outer sections before gluing them together, right back at the start.
As I didn't plan for this I had to use a small grinding bit to cut grooves up the length. Ones the wires were glued in I used filler to cover over them.
You may have noticed 4 wires. 1 permanent positive, 1 permanent negative, and the two negs running from the 2-way switch for the blue and orange. I'm sure there is a more technical/simple way to do this but my brain is not in possession of such knowledge so it was done my way.
It worked, that's the main thing.

Back to those shells.
I mounted the plaster sections on tubing and squirted in the expandable foam.
I mounted the plaster sections on tubing and squirted in the expandable foam.

Not quite as messy as it could've been.

Next morning the fruits of my labours was revealed.
I had a lot of shaping work ahead of me.
I had a lot of shaping work ahead of me.

And here they are, a lot stronger but still not right.
More thinking was required.
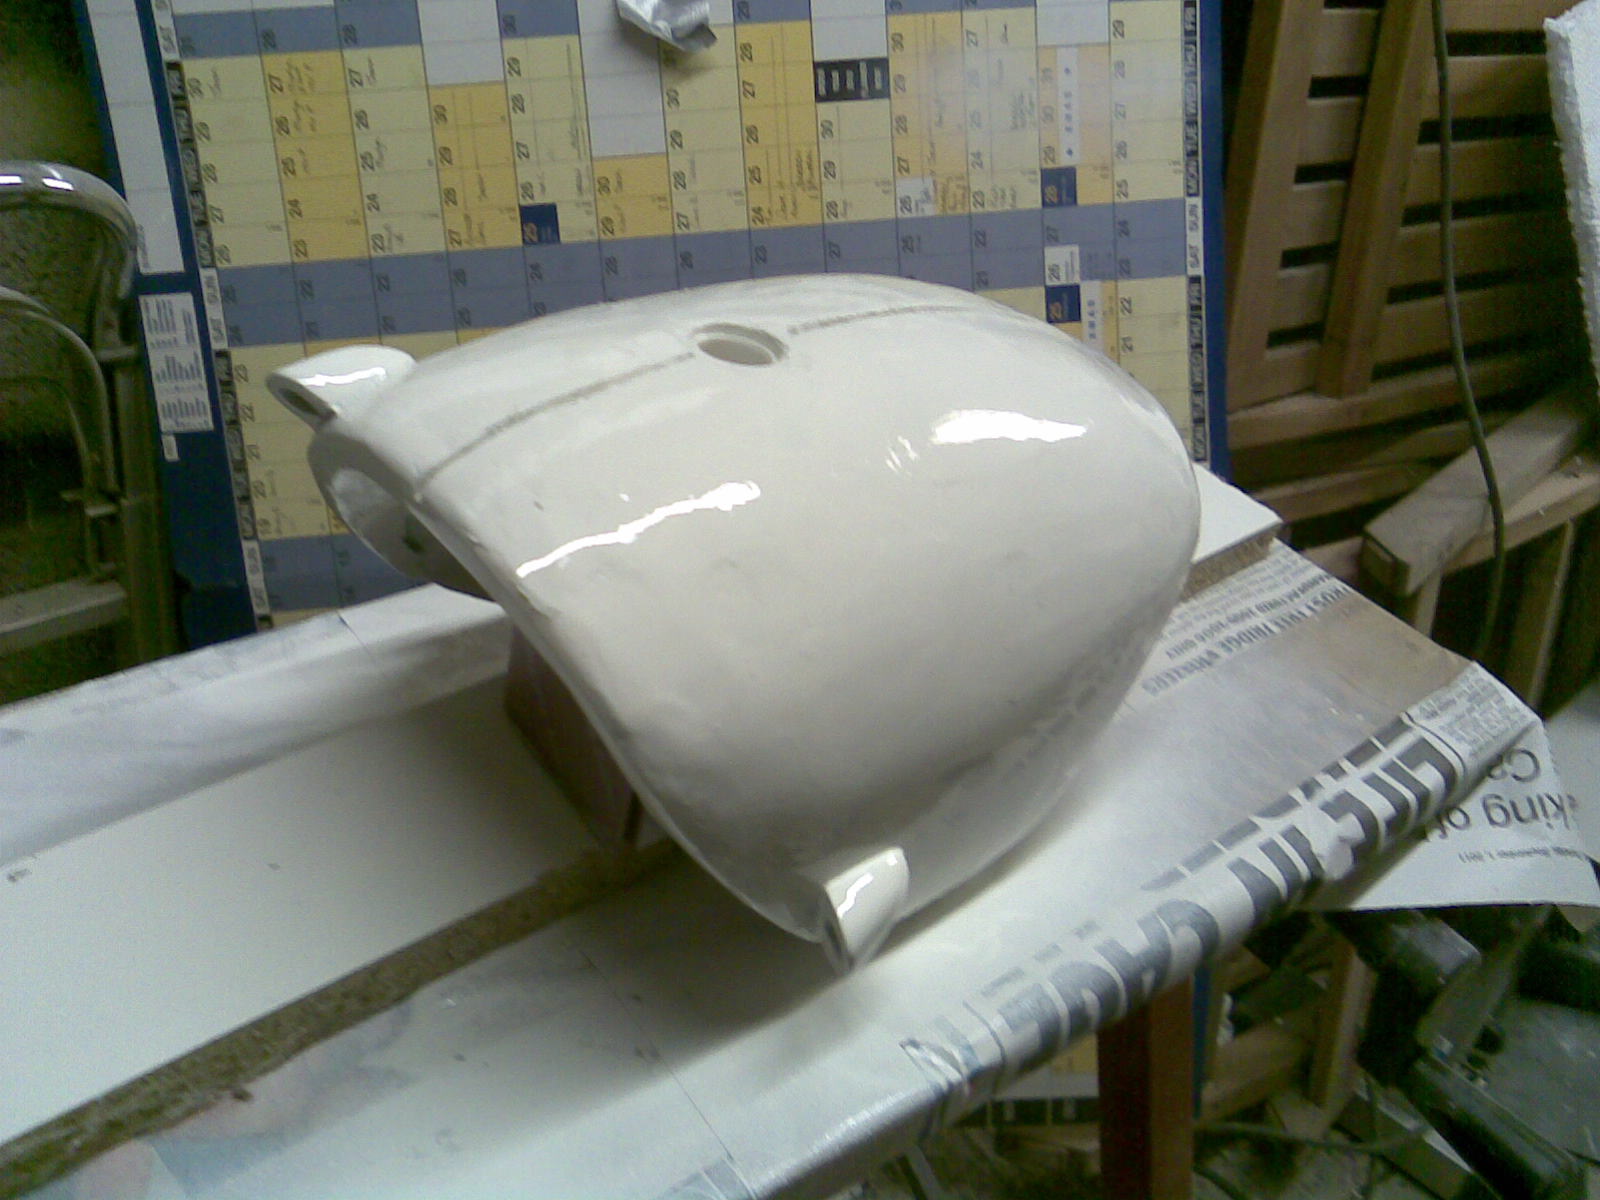
I sprayed them with primer to give a better finish to see where reshaping was needed.
More thinking was required.
I sprayed them with primer to give a better finish to see where reshaping was needed.

Getting there...

Almost...

Time to move onto something else, my brain was dead from sculpting.
That good old, free, 1cm plastic was used to make the ends of the arms.
That good old, free, 1cm plastic was used to make the ends of the arms.

The finished arm.
With the arms finished (except for spraying) I put the pieces together to check where things stood.

Time to fix the arm mounts to the front shell.
I used filler as a glue and pinned them with lengths of 3mm wire.
I used filler as a glue and pinned them with lengths of 3mm wire.

Using cardboard shuttering I poured some plaster supports to make sure the front shell sat against the barrel without gaps.

The 2 discs at each end of the chamber were my next challenge.
My trusty bin lid was my material of choice for these.
My trusty bin lid was my material of choice for these.

I cut the wedge shapes from the same plastic and glued them on to recreate the detailing.

The rear shell has some protrusions for fixing the cables.
As they needed to be identical I went with the moulding option. I sculpted the original from plasticine then made a mould.
As it was the weekend I wasn't at work so I had no rubber. I poured a plaster mould instead and 'cast' the 3 pieces from filler.
As it was the weekend I wasn't at work so I had no rubber. I poured a plaster mould instead and 'cast' the 3 pieces from filler.

This is the plasticine original on the clear perspex and the mould underneath.

I squeezed the filler into the plaster cavity with an L-shaped wire buried in it. As the filler got to the point of drying/curing it was tough enough to be pulled out but just soft enough to give a little and slide out.
Repeat x2 and I had my 3 pieces.
Repeat x2 and I had my 3 pieces.

Here they are fixed into place. These were also pinned for extra strength.

By this point in the build I was down to my final day before it was due to be with Laura.
Panic stations!!!!!
I had to cut a 2mm wide, 2mm deep grove along the length of the rear shell.
I would've loved to have spent more time on this but with spraying and assembly still to do I had very few options, I decided on cutting the grove by eye using a tenon saw. I drilled a hole and inserted a piece of pipe for the rear lights.

LED time. This is one of the clusters of 4 blue/4 orange LEDs that sits at each end of the glowing core. This has all of the resistors in it too. IT'S A MESS but it was all I had time for.

This bolt was how I fixed the front shell section on. It also means that it can come off easily if I ever need to replace the red LEDs.

This coat of paint was put on at 11pm.
I had to be up at 6am to go to Eurogamer to give the gun to Laura.
I sensed a fail.
I had to be up at 6am to go to Eurogamer to give the gun to Laura.
I sensed a fail.
The rear shell was done too.

With only hours to go before I needed to be up and on a train to London I built this in record time.}It's the light array that fits behind the lens. 14 blue and 14 orange LEDs.

I'm sure that all of the electronics experts out there are laughing right now. I don't blame you.
This is the mess I ended up with, all of the resistors are on, some heat-shrink tube for insulation, some hot glue as insulation and I wasn't even sure if it would fit.
This is the mess I ended up with, all of the resistors are on, some heat-shrink tube for insulation, some hot glue as insulation and I wasn't even sure if it would fit.

At least it worked, that was a good sign.
And that's where it stayed, on my bench. I had no time left, it was 3am and I needed to build the gun.
I managed to wire in the core lights at least so the gun did light up in some sense.
I finished at 5am, had an hour sleep, got up and showered, applied the decals to the still tacky paint and headed off to London. The paint was just about touch dry when I got there and Laura looked amazing in her costume.

This is one of the official photos from the expo.
Loads of other gaming websites took her photo and she was mentioned in several of them ans having a great costume.
MY biggest buzz of the day was someone asking if it was the Volpin Props gun.
After bringing the gun back home (I had to wrestle the gun from Laura) I started reworking it.
I sanded down the whole gun (the paint had loads of fingerprints in it), filled holes, filled and re-cut the grove on the rear shell, inserted the red LEDs in the arm mounts, the LEDs in the barrel and the ones in the hole on the rear shell, rewired it and finally reassembled it just in time for her 21st birthday.
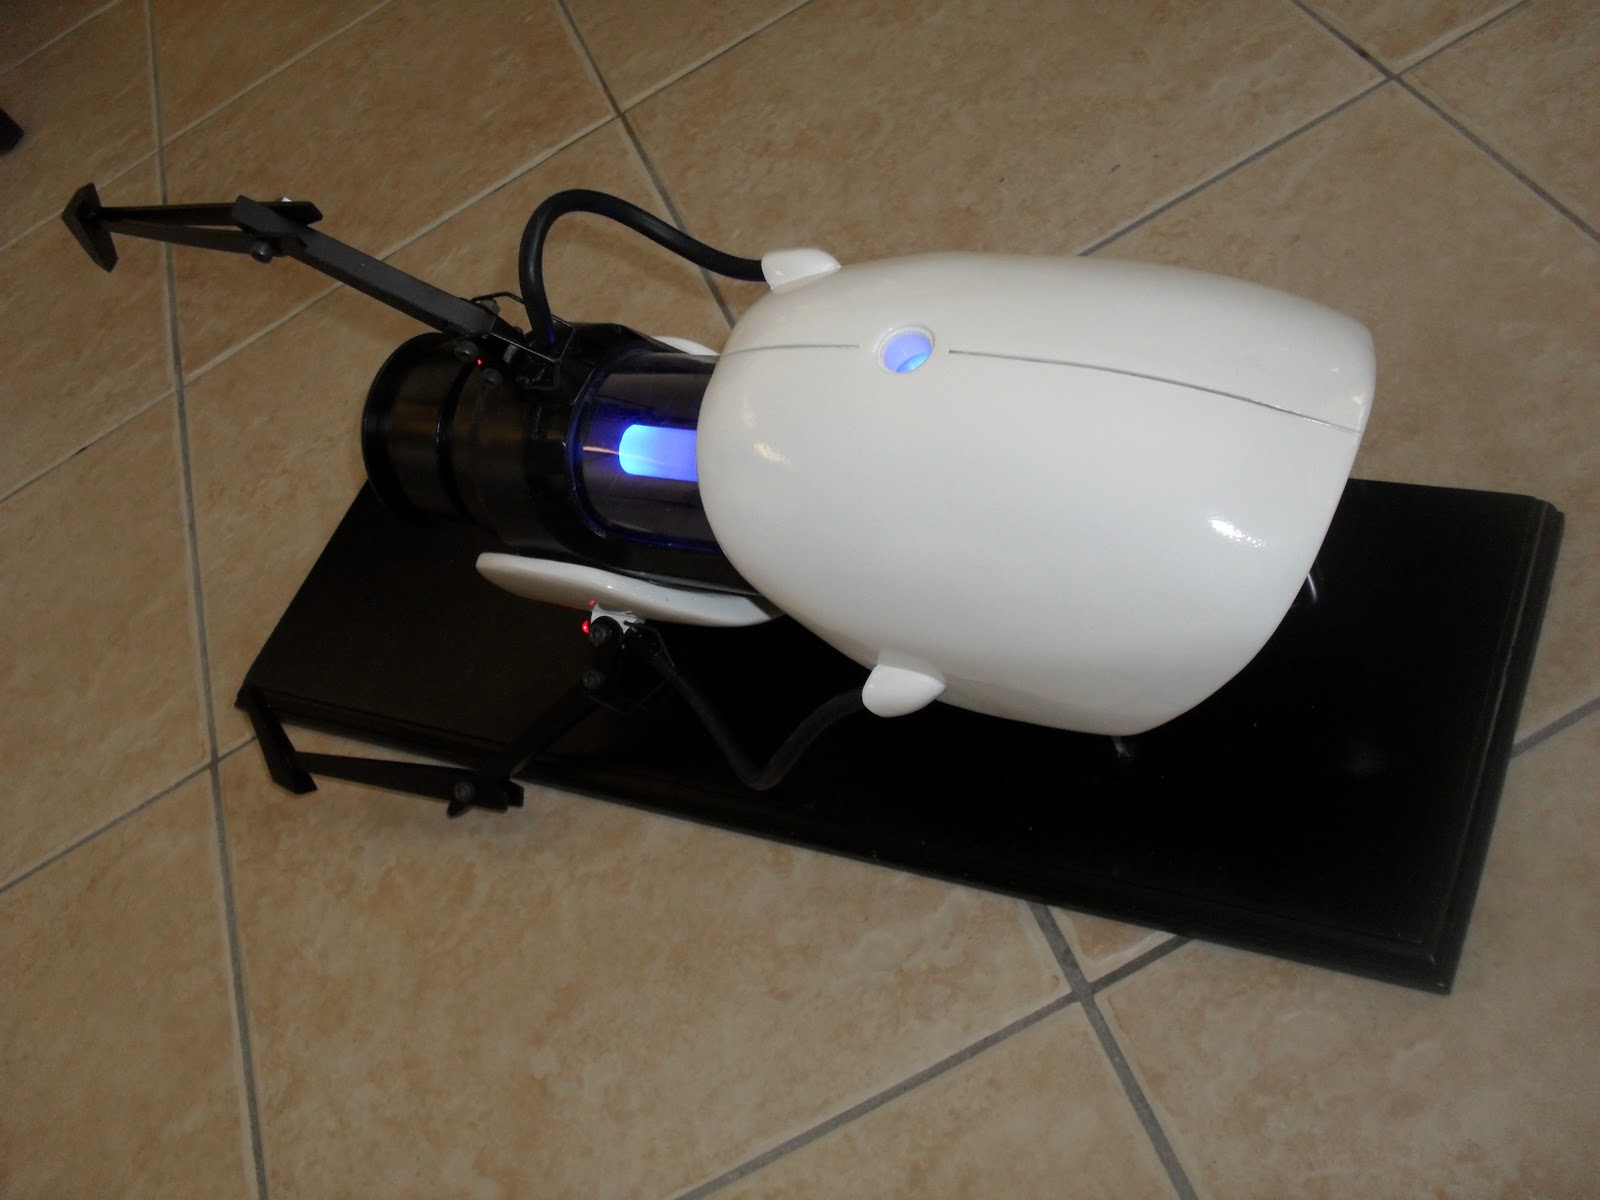
Below are photos of the finished gun and I couldn't be more happy with the result.
It took a lot of ACTUAL blood, sweat and tears to finish it and more late nights that I'd care to count but it was worth it and I (dare i say) enjoyed it.
Thanks again to Harrison Krix at Volpin Props for his build as the inspiration.
Please go and check out his blog to see the amazing work he's done.
http://volpinprops.blogspot.com/
Loads of other gaming websites took her photo and she was mentioned in several of them ans having a great costume.
MY biggest buzz of the day was someone asking if it was the Volpin Props gun.
After bringing the gun back home (I had to wrestle the gun from Laura) I started reworking it.
I sanded down the whole gun (the paint had loads of fingerprints in it), filled holes, filled and re-cut the grove on the rear shell, inserted the red LEDs in the arm mounts, the LEDs in the barrel and the ones in the hole on the rear shell, rewired it and finally reassembled it just in time for her 21st birthday.
Below are photos of the finished gun and I couldn't be more happy with the result.
It took a lot of ACTUAL blood, sweat and tears to finish it and more late nights that I'd care to count but it was worth it and I (dare i say) enjoyed it.
Thanks again to Harrison Krix at Volpin Props for his build as the inspiration.
Please go and check out his blog to see the amazing work he's done.
http://volpinprops.blogspot.com/
I hope you like mine below.
There is a link to a Youtube video of the gun under the last photo.
There is a link to a Youtube video of the gun under the last photo.